Creating a Privacy-First Site Blocker Using Self Protocol
A code-dependent life form.
You know that moment when you promise yourself "just five minutes" on Twitter, and suddenly an hour has vanished? Or when you're trying to focus, but Instagram is just right there?
I've always been fascinated by the idea of parental controls, not just for kids, but for... well, ourselves. We all need a little digital discipline sometimes. But here's the thing, most website blockers are either too easy to bypass (just disable the extension, right?) or they're heavy-handed apps that feel like you're grounding yourself.
That's how Self Lock was born.
Want to follow along? Check out the complete source code here:
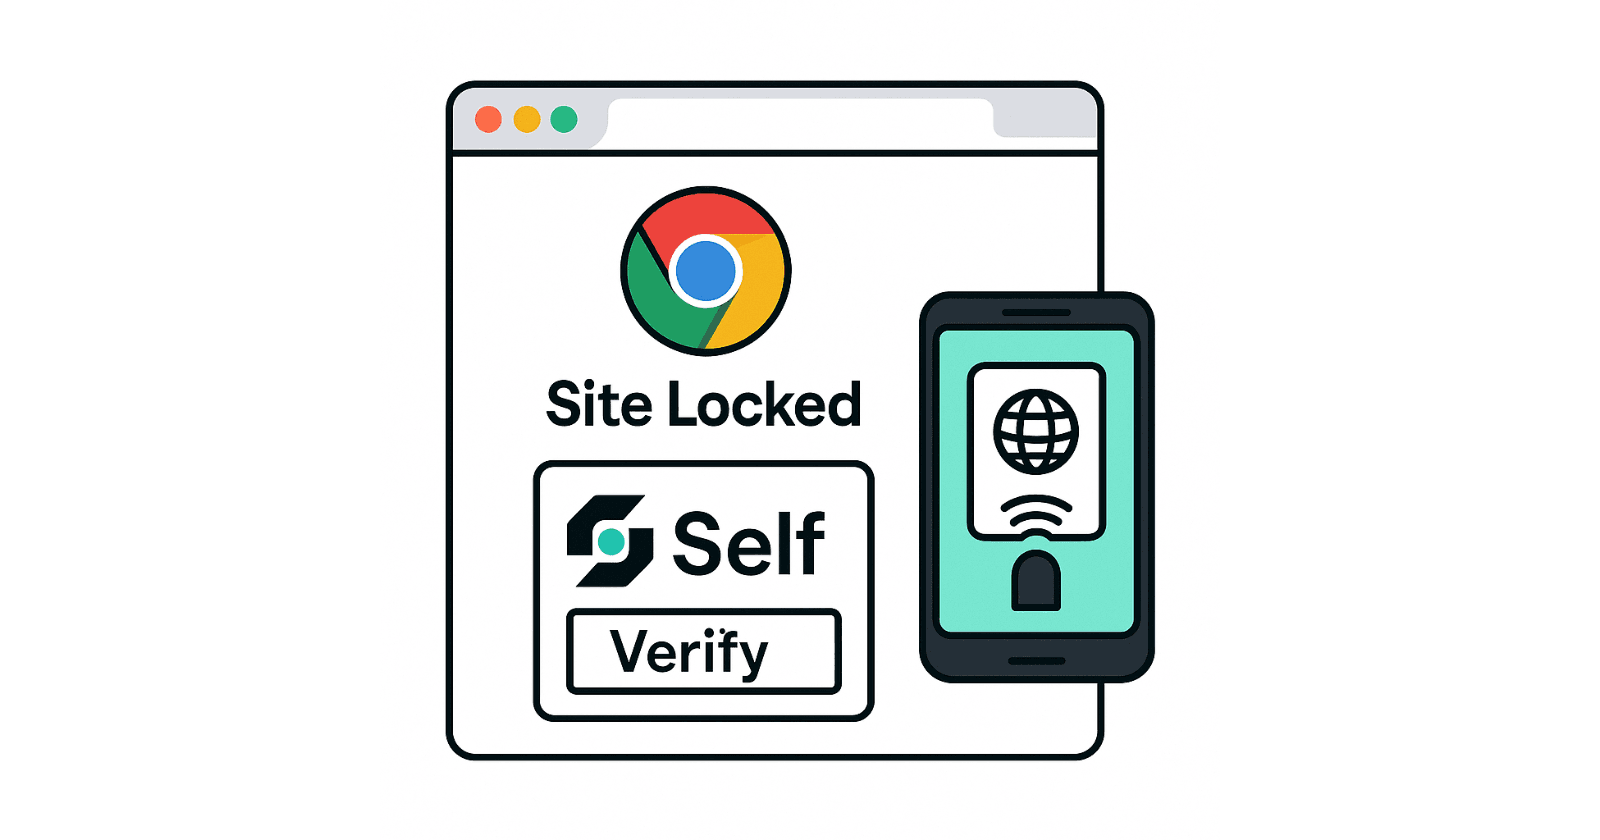
What Is Self Lock?
Self Lock is a Chrome extension that puts your most distracting websites behind a verification wall powered by Self Protocol. Think of it as a digital safe for your attention, you can lock away sites like Twitter, Instagram, Reddit, or any website that pulls you away from what matters.
But here's where it gets interesting: to unlock these sites, you need to verify your identity using the Self mobile app. Once verified, you get a time-limited session (say, 20 minutes) where all protected sites are accessible. When the timer runs out, everything locks again automatically, even if the tabs are still open.
It's like having a responsible friend who taps you on the shoulder and says, "Hey, time's up."

Why Self Protocol?
Before we dive into the technical implementation, let me explain why Self Protocol was perfect for this project.

Self is a privacy-first identity verification protocol that uses zero-knowledge proofs. In simple terms, it lets you prove you're a real person who meets certain criteria (like being over 18) without revealing your actual passport data.
Here's how it works:

In simple steps:
You scan your passport using NFC on your phone
Self creates a cryptographic proof about your identity
You can selectively share information (like "I'm over 18" or "I'm not on the OFAC sanctions list")
Applications verify the proof without ever seeing your raw passport data
The Vision
While I built this as a focus tool, the use cases are much broader:
For Parents: Create a safe browsing environment for kids. Lock adult content or time-wasting sites behind your verification. Kids can't bypass it without your phone and passport.
For Focus: ADHD warriors and anyone who struggles with digital distractions can set boundaries. During work hours, social media stays locked unless you deliberately choose to break the seal.
For Privacy Advocates: Demonstrate how Web3 identity solutions can work in everyday applications, not just crypto trading.
For Developers: A complete reference implementation showing how to integrate Self Protocol into a real-world application with a clean UX.
This is just a proof-of-concept, the blocked sites are stored in local storage, not a database. In production, you'd want server-side management, family sharing features, and more. But it demonstrates the core concept beautifully.
How I Built It
Chrome Extension Basics
If you've never built a Chrome extension, the architecture might seem a bit mysterious at first. Chrome extensions have several moving parts:

The key components:
Manifest file (
manifest.json): The blueprint that tells Chrome what your extension can doBackground script: A service worker that runs invisibly, managing state and logic
Content scripts: JavaScript injected into web pages to interact with the DOM
Popup UI: The interface users see when they click your extension icon
For Self Lock, I went with Manifest V3, the latest standard that Chrome is pushing everyone toward.
Here's what the manifest looks like:
{
  "manifest_version": 3,
  "name": "Self Lock",
  "version": "0.1.0",
  "description": "Lock websites behind Self Protocol verification",
  "permissions": ["storage", "tabs", "scripting"],
  "host_permissions": ["<all_urls>"],
  "background": {
    "service_worker": "background.js",
    "type": "module"
  },
  "content_scripts": [{
    "matches": ["<all_urls>"],
    "js": ["contentScript.js"],
    "run_at": "document_idle"
  }],
  "action": {
    "default_popup": "index.html",
    "default_icon": "self-icon.png"
  }
}
The permissions are straightforward:
storage: To save which sites are protected and session data
tabs: To monitor when you navigate to protected sites
scripting: To inject the blur overlay on locked pages
Why I Chose Vite
Most Chrome extension tutorials use Webpack, but I went with Vite because it's significantly faster and the config is much cleaner.
Here's the beauty of Vite for Chrome extensions, you can define multiple entry points (background script, content script, popup UI) and it bundles them all correctly:
// vite.config.ts
export default defineConfig({
  plugins: [react()],
  build: {
    outDir: 'dist',
    rollupOptions: {
      input: {
        popup: resolve(__dirname, 'index.html'),
        background: resolve(__dirname, 'src/background.ts'),
        contentScript: resolve(__dirname, 'src/contentScript.ts'),
      },
      output: {
        entryFileNames: '[name].js',
        chunkFileNames: 'assets/[name].js',
        assetFileNames: 'assets/[name].[ext]'
      }
    }
  }
});
When you run npm run build, Vite compiles everything to a dist/ folder that's ready to load into Chrome. The whole build takes seconds, not minutes like Webpack.

Part 1: The Background Service Worker
The background script is the brain of the extension. It runs invisibly and manages all the core logic.
Here's what it does:
1. Monitors tab updates to check if you're navigating to a protected site:
// background.ts.
chrome.tabs.onUpdated.addListener(async (tabId, changeInfo, tab) => {
  if (changeInfo.status !== "complete" || !tab.url) return;

  const hostname = hostnameFromUrl(tab.url);
  const { protectedSites, session } = await getStorage();

  const isProtected = protectedSites.includes(hostname);
  const hasValidSession = isSessionValid(session);

  // Decide: should this page be locked?
  if (isProtected && !hasValidSession) {
    chrome.tabs.sendMessage(tabId, { type: "LOCK_SITE" });
  } else {
    chrome.tabs.sendMessage(tabId, { type: "UNLOCK_SITE" });
  }
});
2. Handles messages from the popup and content scripts:
chrome.runtime.onMessage.addListener((message, sender, sendResponse) => {
  if (message?.type === "SESSION_UPDATED") {
    // Session changed, update all open tabs.
    updateAllTabs();
  }

  if (message?.type === "GET_STATUS_FOR_URL") {
    // Popup asking: "Is this site locked?"
    const { hostname } = message;
    const isLocked = /* check logic */;
    sendResponse({ locked: isLocked });
  }
});
3. Stores data using Chrome's storage API:
// storage.ts.
export async function getStorage(): Promise<ExtensionStorage> {
  const data = await chrome.storage.local.get(null);
  return {
    protectedSites: data.protectedSites || [],
    session: data.session || null,
    sessionDurationMinutes: data.sessionDurationMinutes || 20
  };
}

export async function setStorage(updates: Partial<ExtensionStorage>) {
  await chrome.storage.local.set(updates);
}
The storage schema is simple:
type ExtensionStorage = {
  protectedSites: string[];           // ["twitter.com", "instagram.com"]
  session: {
    verified: boolean;
    expiresAt: number;                // Unix timestamp.
    verificationSummary: string;      // "Nationality US · Age ≥ 18".
  } | null;
  sessionDurationMinutes: number;     // Default: 20.
};
Storage Architecture:

Everything lives in chrome.storage.local, which persists across browser restarts. This means if you set up protected sites and close Chrome, they're still protected when you reopen.
Part 2: The Content Script
The content script runs on every page you visit. Its job is simple: show or hide the blur overlay based on messages from the background script.
Here's the overlay creation logic:
// contentScript.ts.
function createOverlay() {
  if (document.getElementById("self-lock-overlay")) return;

  const overlay = document.createElement("div");
  overlay.id = "self-lock-overlay";
  overlay.style.cssText = `
    position: fixed;
    top: 0; left: 0; right: 0; bottom: 0;
    background: linear-gradient(to bottom, rgba(15,23,42,0.95), rgba(30,41,59,0.98));
    backdrop-filter: blur(14px);
    z-index: 2147483647;
    display: flex;
    align-items: center;
    justify-content: center;
  `;

  const card = document.createElement("div");
  card.innerHTML = `
    <div style="background: rgba(30,41,59,0.8); padding: 2rem; border-radius: 1rem; max-width: 500px; text-align: center;">
      <h1 style="font-size: 1.5rem; font-weight: bold; color: white; margin-bottom: 1rem;">
        🔒 Self Lock Enabled
      </h1>
      <p style="color: #94a3b8; margin-bottom: 1.5rem;">
        This website is protected. Open the Self Lock extension and verify your identity to access it.
      </p>
      <span style="background: #1e293b; color: #60a5fa; padding: 0.5rem 1rem; border-radius: 0.5rem; font-size: 0.875rem;">
        Protected Site
      </span>
    </div>
  `;

  overlay.appendChild(card);
  document.body.appendChild(overlay);
}
The beauty of using inline styles is avoiding CSS conflicts with the page you're blocking.

But here's the cool part: When the session expires, the content script automatically re-locks the page without a refresh:
function setupExpiryTimer(session: SelfSession) {
  const remaining = session.expiresAt - Date.now();

  expiryTimeoutId = window.setTimeout(async () => {
    // Time's up! Re-check session validity.
    const { session: latestSession } = await getStorage();

    if (!isSessionValid(latestSession)) {
      createOverlay(); // Lock the page again.
    }
  }, remaining + 500); // 500ms buffer.
}
Imagine you're scrolling Twitter, your 20-minute timer expires, and boom, the page blurs right there. No navigation needed. That's the magic of content scripts with timers.
Part 3: The Popup UI
For the popup interface, I wanted something modern and clean. The popup has three main sections:
1. Current Site Card
Shows the site you're on and lets you quickly protect/unprotect it:
// App.tsx.
const isCurrentSiteProtected = state.protectedSites.includes(state.activeHost || '');

<div className="bg-slate-800 rounded-lg p-4">
  <h3 className="text-sm font-semibold text-slate-400 mb-2">Current site</h3>
  <div className="flex items-center justify-between">
    <span className="text-white font-mono">{state.activeHost || 'Unknown'}</span>
    <button
      onClick={toggleProtectionForCurrent}
      className={isCurrentSiteProtected ? 'bg-blue-500' : 'bg-slate-700'}
    >
      {isCurrentSiteProtected ? 'Protected' : 'Not protected'}
    </button>
  </div>
</div>

2. Session Card
This is where the Self Protocol integration happens:
const app = new SelfAppBuilder({
  version: 2,
  appName: "Self Lock",
  scope: "demo-scope",
  endpoint: "https://your-server.ngrok.io/api/verify",
  userId: ethers.ZeroAddress,
  endpointType: "staging_https",
  disclosures: {
    minimumAge: 18,
    ofac: true,
    nationality: true,
    gender: true
  }
}).build();

<SelfQRcodeWrapper
  selfApp={app}
  onSuccess={handleSuccessfulVerification}
  onError={handleError}
  type="websocket"
  size={140}
/>
The SelfQRcodeWrapper component from @selfxyz/qrcode does all the heavy lifting:
Generates a QR code with a universal link
Manages WebSocket connection for real-time verification
Calls your callback when verification succeeds
When verification succeeds, I fetch the details and create a session:
const handleSuccessfulVerification = async () => {
  // Fetch verification details from backend.
  const res = await fetch('http://localhost:3001/debug/last-result');
  const data = await res.json();

  // Extract nationality and age.
  const nationality = data.result?.nationality || 'Unknown';
  const minimumAge = data.result?.minimumAge || 18;

  // Create session.
  const newSession: SelfSession = {
    verified: true,
    expiresAt: Date.now() + sessionDurationMinutes * 60 * 1000,
    verificationSummary: `Nationality ${nationality} · Age ≥ ${minimumAge}`
  };

  await setStorage({ session: newSession });
  chrome.runtime.sendMessage({ type: "SESSION_UPDATED" });

  setState(prev => ({ ...prev, session: newSession, viewState: 'verified' }));
};

3. Protected Sites Manager
A simple list with add/remove functionality:
<div className="bg-slate-800 rounded-lg p-4">
  <h3 className="text-sm font-semibold text-slate-400 mb-3">Protected sites</h3>

  <input
    type="text"
    placeholder="twitter.com"
    value={newSite}
    onChange={(e) => setNewSite(e.target.value)}
    className="w-full bg-slate-700 text-white rounded px-3 py-2 mb-3"
  />
  <button onClick={handleAddSite} className="w-full bg-blue-500 text-white rounded py-2">
    Add Site
  </button>

  <ul className="mt-3 space-y-2">
    {state.protectedSites.map(site => (
      <li key={site} className="flex items-center justify-between">
        <span className="text-white font-mono">{site}</span>
        <button onClick={() => handleRemoveSite(site)} className="text-red-400">
          Remove
        </button>
      </li>
    ))}
  </ul>
</div>
The UI stays minimal and functional. No clutter, just what you need.

Part 4: The Backend Verifier
The extension needs a backend to verify Self proofs. I built a simple Express server:
// server/index.mjs.
import express from 'express';
import { SelfBackendVerifier, AllIds } from '@selfxyz/core';

const app = express();
app.use(express.json());

const selfBackendVerifier = new SelfBackendVerifier(
  "demo-scope",
  "https://your-ngrok-url.ngrok.io/api/verify",
  true, // mockPassport for staging.
  AllIds,
  {
    minimumAge: 18,
    excludedCountries: [],
    ofac: true
  },
  "hex"
);

let lastVerificationResult = null;

app.post('/api/verify', async (req, res) => {
  const { attestationId, proof, publicSignals, userContextData } = req.body;

  try {
    const result = await selfBackendVerifier.verifyCredentials(
      attestationId,
      proof,
      publicSignals,
      userContextData
    );

    lastVerificationResult = result;

    const { isValid, isMinimumAgeValid, isOfacValid } = result.isValidDetails;

    if (!isValid || !isMinimumAgeValid || isOfacValid) {
      return res.status(200).json({
        status: 'error',
        result: false,
        reason: !isValid ? 'Invalid proof' :
                !isMinimumAgeValid ? 'Under 18' :
                'OFAC sanctions list'
      });
    }

    res.json({ status: 'success', result: true });
  } catch (error) {
    res.status(500).json({ status: 'error', message: error.message });
  }
});

app.get('/debug/last-result', (req, res) => {
  res.json(lastVerificationResult);
});

app.listen(3001, () => console.log('Server running on port 3001'));
Important: The verification endpoint needs to be publicly accessible for the Self app to reach it. I used Ngrok for development:
ngrok http 3001
# Outputs: https://abc123.ngrok-free.app.
Then update both .env files to use this URL.
The complete verification flow:

Flow breakdown:
User scans QR code with Self app
Self app sends cryptographic proof to
https://abc123.ngrok-free.app/api/verifyBackend verifies proof using Self SDK
Backend stores result in memory (for debug endpoint)
Extension polls
/debug/last-resultto get verification summaryExtension creates session and unlocks sites
In production, you'd want a proper database and webhook-based notifications instead of polling.
The Message Passing Architecture
One of the trickiest parts of building Chrome extensions is getting all the pieces to talk to each other. Here's how messages flow in Self Lock:

Use Cases
1. Parental Control
Sarah is a parent with two teenagers who share a family computer. She uses Self Lock to protect adult content sites and time-wasting platforms. Her kids can browse normally, but when they hit a protected site, they need Sarah to scan her passport with the Self app on her phone.
This is way better than:
Remembering passwords (kids might see you type it)
Using "parental control" software (often buggy and intrusive)
Blocking sites at router level (too broad, affects everyone)
With Self Lock, Sarah can unlock all sites for 30 minutes if a kid needs access for legitimate research, then everything auto-locks again.
2. ADHD Focus Tool
Marcus has ADHD and works from home. He blocks Twitter, Reddit, YouTube, and news sites during work hours. When he's tempted to check Twitter "just for a second," he has to:
Open the Self Lock extension
Pull out his phone
Open the Self app
Scan his passport with NFC
By the time he'd complete these steps, the urge usually passes. And if he does unlock it, the 20-minute timer ensures he can't stay there all day. When time's up, the page blurs, even if he has 10 tabs open.
Marcus says the physical friction is what makes it work. "A password I could type without thinking. This? This makes me stop and ask: 'Do I really want to do this?'"
3. Privacy-Conscious Users
Emma is a privacy advocate who wants to demonstrate Web3 identity solutions. She uses Self Lock as a conversation starter: "Check this out, I can prove I'm over 18 and not on a sanctions list without showing you my passport."
She's even thinking of forking the project to add features like:
Shared family accounts: Multiple people can unlock with their own Self verification
Time-of-day rules: Auto-protect sites during work hours
Usage analytics: How much time you spend on unlocked sites
Remote management: Parents can manage kids' settings from a web dashboard
Advantages of Building with Self Protocol
After building this project, I'm convinced Self Protocol is underrated for consumer apps. Here's why:
1. Privacy by Design
Traditional identity systems require you to upload documents, take selfies, or connect social accounts. Self uses zero-knowledge proofs, your data never leaves your phone. The extension only sees:
{
  verified: true,
  nationality: "US",
  ageOver18: true,
  ofacClear: true
}
No names, no passport numbers, no photos.
2. Sybil Resistance
Because Self uses NFC passport scanning, it's extremely difficult to create fake identities. One passport = one identity. This makes Self Lock useful for:
Fair access systems: Ensure one person = one unlock session
Anti-bot protection: Prove you're human without CAPTCHA
Compliance: Meet age verification requirements for adult content
3. Developer Experience
The Self SDK is remarkably easy to use. From zero to working QR code:
import { SelfAppBuilder } from '@selfxyz/qrcode';

const app = new SelfAppBuilder({
  appName: "My App",
  scope: "my-scope",
  endpoint: "https://my-server.com/verify",
  disclosures: { minimumAge: 18 }
}).build();

<SelfQRcodeWrapper selfApp={app} onSuccess={handleSuccess} />
That's it. The SDK handles universal links, WebSocket connections, proof formats, all abstracted away.
4. Future-Proof
As Web3 identity solutions mature, Self is positioned as a credible player. Self Protocol is:
Open source: Auditable code, community-driven
Interoperable: Works with Ethereum, Celo, and other chains
Standards-compliant: Follows W3C DID standards
Building with Self now means you're ready for a future where decentralized identity is the norm.
The POC Nature
You might notice this project stores everything in local storage, no database, no server-side state management. This is intentional.
Self Lock is a proof-of-concept designed to demonstrate:
How Self Protocol can be integrated into a browser extension
How cryptographic identity verification works in practice
That privacy-preserving parental controls are technically feasible
For a production app, you'd want:
Database for protected sites: Allow family sharing, remote management
User accounts: Multiple people in a household, each with their own Self identity
Webhook-based verification: Instead of polling
/debug/last-result, use webhooksCloud sync: Settings sync across devices
Scheduled rules: "Block Twitter Monday-Friday 9am-5pm"
Usage reports: Server-side analytics on unlock frequency and duration
But all of that adds complexity. For showing "here's how Self can power a real-world app," local storage is perfect. It keeps the codebase clean and focused on the core concept.
How to Use Self Lock?
Ready to try it? Here's the full setup:
Prerequisites
Node.js 18+ (Self SDK recommends Node 22)
Chrome browser (or any Chromium-based browser)
Self mobile app (iOS/Android, available in app stores)
ngrok (free account for public URL)
Step 1: Clone the Repository
git clone https://github.com/kartikmehta8/self-lock-chrome-extension.git
cd self-lock-chrome-extension
Step 2: Set Up the Backend
cd server
npm install
Create server/.env:
PORT=3001
SELF_SCOPE=demo-scope
SELF_ENDPOINT=https://YOUR_NGROK_URL.ngrok-free.app/api/verify
Start the backend:
npm run dev
In a separate terminal, expose it with ngrok:
ngrok http 3001
Copy the ngrok URL (e.g., https://abc123.ngrok-free.app) and update SELF_ENDPOINT in server/.env.
Step 3: Set Up the Extension
cd chrome-extension
npm install
Create chrome-extension/.env:
VITE_SELF_APP_NAME=Self Lock
VITE_SELF_SCOPE=demo-scope
VITE_SELF_ENDPOINT=https://abc123.ngrok-free.app/api/verify
VITE_SELF_DEBUG_ENDPOINT=http://localhost:3001/debug/last-result
VITE_SESSION_MINUTES=20
Important: VITE_SELF_SCOPE and VITE_SELF_ENDPOINT must match the backend's values.
Build the extension:
npm run build
Step 4: Load Extension in Chrome
Open Chrome and navigate to
chrome://extensionsEnable Developer mode (toggle in top-right corner)

Click Load unpacked
Select the
chrome-extension/distfolder
You should see "Self Lock" appear with the Self icon.

Final Thoughts
Self Lock shows that privacy and security don't have to be enemies of good UX. With the right tools (Self Protocol, modern build systems, thoughtful design), we can create apps that:
Respect user privacy
Provide real value
Feel delightful to use
That's the kind of software I want to build. I hope this project inspires you to build something cool too.
If you build something with Self Protocol, I'd love to hear about it. And if you fork Self Lock and add features, send a PR! Let's build the privacy-respecting web together.
If you ever need help or just want to chat, DM me on Twitter / X or LinkedIn.